
Star Wars Lightsaber Coookies
We are in the official countdown to the release of the latest Star Wars movie! I can’t wait! To celebrate the launch, we’re sharing these cute, and easy, Star Wars lightsaber sugar cookies recipes! After checking out this step-by-step tutorial, also check out our Star Wars Yoda cookies!
Star Wars Lightsaber Cookies

Cookie Ingredients:
- 5 cups flour
- 2 tsp baking powder
- 1 tsp salt
- 1 1/2 cups soft unsalted butter
- 2 cups granulated sugar
- 4 eggs
- Letter “X” cookie cutter
Cookie Directions:
Cream the soft butter with the sugar until the combination is smooth not grainy to the touch in a mixing bowl.
Add all 4 eggs at one time, continue to mix.
Add the vanilla, continue mixing.
Sift the four, baking powder, and salt together. Add the dry mixture to the wet mixture. Continue mixing to make sure all ingredients are thoroughly blended.
Make the dough into a ball. Wrap it in cling wrap completely covering the entire dough ball. Put in the refrigerator for about 6 hours, or overnight. Check to see if the dough is firm.
Preheat oven to 325 degrees.
Pull the cookie dough out of the refrigerator and sit it out to soften up a bit.
Put flour out on the wood cutting board, rub flour on the rolling pin, and work some flour into the batter, as needed. Be careful not to overdo it on the flour or the cookies will become stiff.
Roll the dough out on the cutting board and cut out your cookie shapes. Line the cookie sheet with parchment paper. Use a metal spatula to move the cut cookies to the parchment lined cookie sheet.
Bake at 325 degrees for 8 minutes. Check to see if the cookies are thoroughly baked. Take the cookies off of the cookie sheet and put on a wire rack to cool completely. (About 10 minutes).
Royal Icing Ingredients:
- 2 egg whites
- 1 cups powder sugar
- 1/2 tsp cream of tartar
- Green, black, red, and grey gel food coloring
Icing Directions:
Combine all ingredients (except your food coloring) in a mixing bowl mixing on medium speed for 4 minutes. If icing is not stiff enough add 1/4 C powder sugar.
Divide the icing 5 bowls, as follows. You’ll add as much food coloring as needed to get your desired color, and stir until the color is even throughout.
- Bowl 1: 4 tablespoons icing and black gel food coloring.
- Bowl 2: 4 tablespoons of icing and red gel food coloring.
- Bowl 3: 4 tablespoons of icing and grey gel food coloring.
- Bowl 4: 4 tablespoons of icing and green gel food coloring.
- Bowl 5: The rest of the icing, leave white.
This 4-pack of Halloween gel food coloring is a great place to start as it has the key colors you need for these cookies!

Spoon each color of icing into individual frosting bags with a #5 tips. Twist the open end of the bag to push the icing to the tip.

Frosting the Lightsaber Cookies:
Outline each of the lightsaber cookies in white. Thin the frosting by squeezing the majority of the icing into a bowl then add 1 tsp of water to this and mix it in.

Return to the piping bag and fill in the cookies with your now thinner white icing. Leave a small amount of the icing in the frosting bag for later use on the cookies.
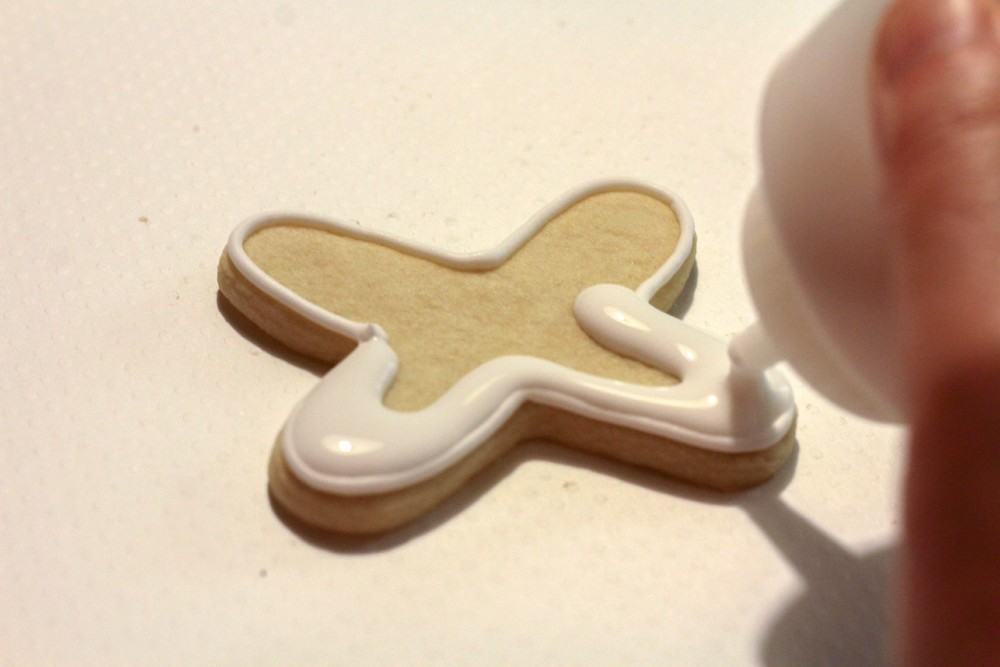
On these cookies the details are hand drawn following an outline or picture. Use our example to add the details to the cookies. After outlining and filling in the cookies allow them to dry for 30 seconds before adding the details.
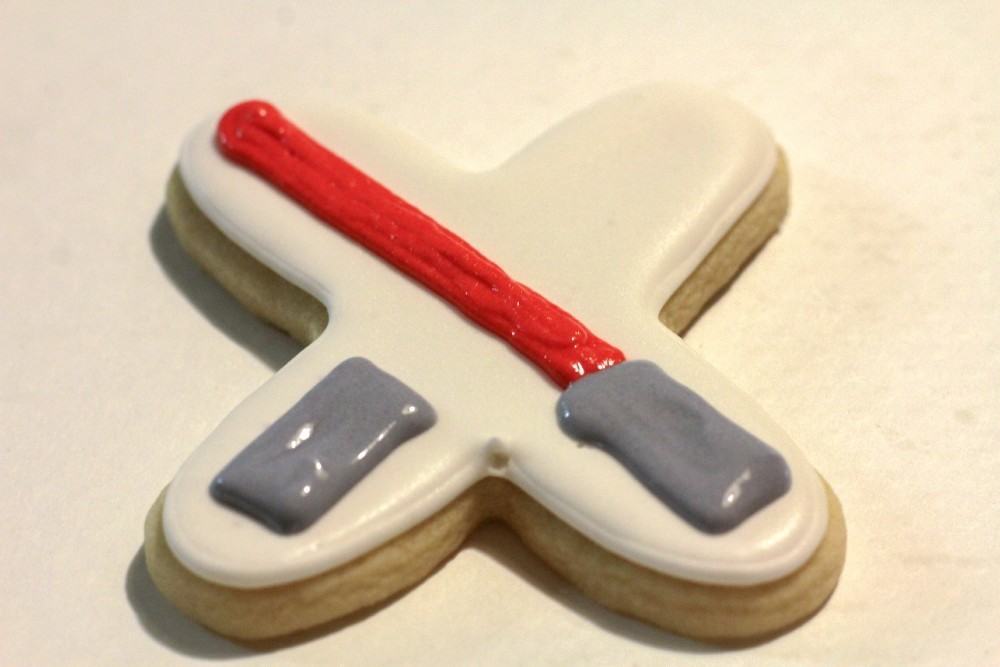
In the lower half of each leg of your X, form a rectangle grey handle. Then, follow the outline of the “X” up one side outlining and filling in your outline with red icing until you reach the individual top of the “X”. Allow this to dry for 30 seconds.
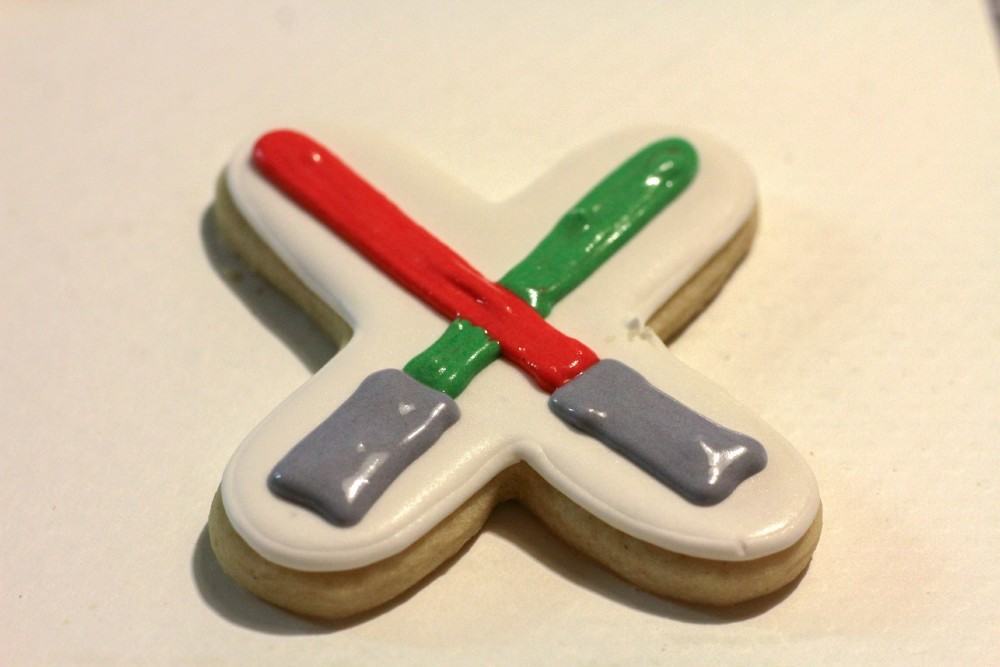
Start at the other handle and follow the outline of the X up to the top outlining and filling in with green icing, stopping where the red light saber is already outlined and continuing again on the other side. Allow this to dry for 30 seconds.
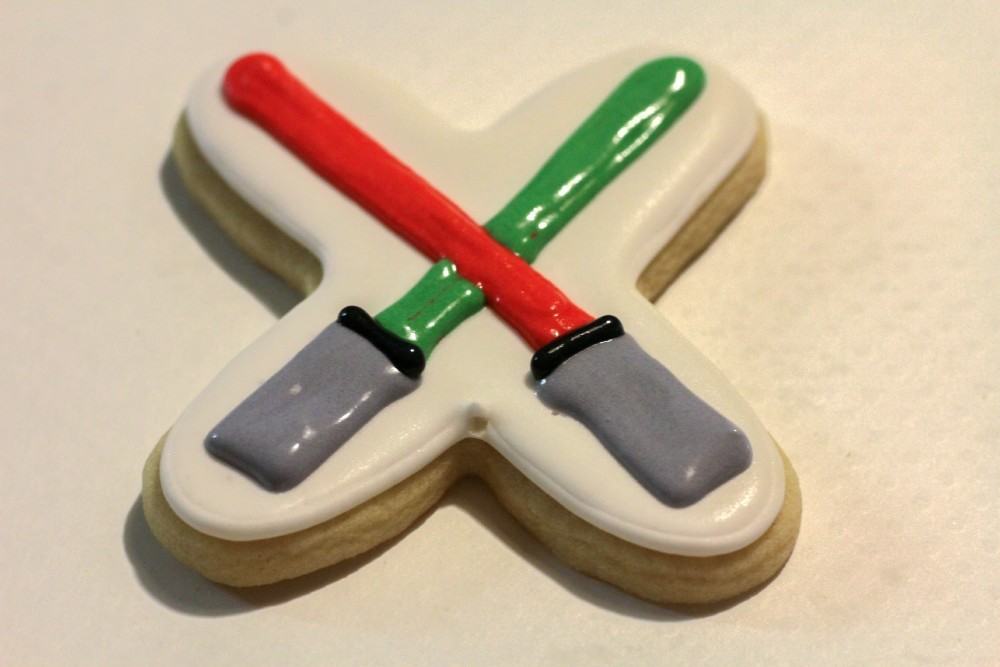
Now add the two small black lines to the end of the grey icing, and a red dot on top of your grey handles.

We’ve previously shared adorable Star Wars Yoda cookies! Head over next to learn how to make those cookies, too! You’ll use a lot of the same colors and they are perfect for creating both designs for a party!
Yoda Cookies Tutorial Here

How to Make Star Wars
Lightsaber Cookies
Star Wars Lightsaber Cookies

Star Wars inspired lightsaber cookies! See how to make these darling lightsaber sugar cookies with the step-by-step decorating guide!
Ingredients
Cookie Ingredients:
- 5 cups flour
- 2 tsp baking powder
- 1 tsp salt
- 1 1/2 cups soft unsalted butter
- 2 cups granulated sugar
- 4 eggs
- Letter “X” cookie cutter
Royal Icing Ingredients:
- 2 egg whites
- 1 cup powder sugar
- 1/2 tsp cream of tartar
- Green, black, red, and grey gel food coloring
Instructions
Cookie Directions:
- Cream together butter and sugar until smooth. Add all 4 eggs at one time, continue to mix. Add the vanilla, continue mixing.
- Sift the four, baking powder, and salt together. Add the dry mixture to the wet mixture. Continue mixing to make sure all ingredients are thoroughly blended.
- Form the dough into a ball. Wrap it in plastic wrap completely covering the entire dough ball. Put in the refrigerator for about 6 hours, or overnight. Check to see if the dough is firm.
- Preheat oven to 325 degrees. Pull the cookie dough out of the refrigerator and sit it out to soften up a bit.
- Put flour out on the wood cutting board, rub flour on the rolling pin, and work some flour into the batter, as needed. Be careful not to overdo it on the flour or the cookies will become stiff.
- Roll the dough out on the cutting board and cut out your cookie shapes. Line the cookie sheet with parchment paper. Use a metal spatula to move the cut cookies to the parchment lined cookie sheet.
- Bake at 325 degrees for 8 minutes. Check to see if the cookies are thoroughly baked. Take the cookies off of the cookie sheet and put on a wire rack to cool completely. (About 10 minutes).
Icing Directions:
- Combine all ingredients (except your food coloring) in a mixing bowl mixing on medium speed for 4 minutes. If icing is not stiff enough add 1/4 cup powder sugar.
- Divide the icing 5 bowls, as follows. You’ll add as much food coloring as needed to get your desired color, and stir until the color is even throughout.
- Bowl 1: 4 tablespoons icing and black gel food coloring.
- Bowl 2: 4 tablespoons of icing and red gel food coloring.
- Bowl 3: 4 tablespoons of icing and grey gel food coloring.
- Bowl 4: 4 tablespoons of icing and green gel food coloring.
- Bowl 5: The rest of the icing, leave white. - Spoon each color of icing into individual frosting bags with a #5 tips. Twist the open end of the bag to push the icing to the tip.
Frosting the Lightsaber Cookies:
- Outline each of the lightsaber cookies in white. Thin the frosting by squeezing the majority of the icing into a bowl then add 1 tsp of water to this and mix it in. Return to the piping bag and fill in the cookies with your now thinner white icing. Leave a small amount of the icing in the frosting bag for later use on the cookies.
- On these cookies the details are hand drawn following an outline or picture. Use our example to add the details to the cookies. After outlining and filling in the cookies allow them to dry for 30 seconds before adding the details. In the lower half of each leg of your X, form a rectangle grey handle. Then, follow the outline of the “X” up one side outlining and filling in your outline with red icing until you reach the individual top of the “X”. Allow this to dry for 30 seconds.
- Start at the other handle and follow the outline of the X up to the top outlining and filling in with green icing, stopping where the red light saber is already outlined and continuing again on the other side. Allow this to dry for 30 seconds.
- Now add the two small black lines to the end of the grey icing, and a red dot on top of your grey handles.


Wow, great job on these cookies! A must have for Star Wars fans everywhere!!
howwww cook and very creative. also they are so neat and well made. i would have to stare at them because i ate them. lol.
Now that is the coolest thing ever. You make it looks so easy!
Best. Cookies. EVER! Not only did you rock the light sabers, you did Yoda up right, as well!
These are adorable! I love the idea of using an X cookie cutter to make the shape.
So stinkin’ cute! We’re gearing up for the premiere in our house, too. May the Force be with you… 😉
Seriously cute and my daughter is the biggest star wars fan, we need to make these!
These look fantastic!!! Almost too cute to eat!
These are the cutest Star Wars cookies. Very nice!